If you finished a bottle of liquid laundry detergent don't throw it away!
Instead fill it up with some water (depending on how much detergent is still left in there, there is always a little rest stuck to the bottle).
I use this newly won solution for cleaning all kinds of things, it especially works well on our steel kitchen counters! Never do I get them so clean and shiny with anything else, its amazing.
It seems that the enzymes in the detergent break down the dirt into smaller, more water-soluble pieces which can then be washed away more easy.
Plus, it smells sooo good! :)

Tutorials, Crafts, Life Hacks and homegrown crafts ...Welcome to the Cotton Candy Castle.
Sep 22, 2010
Polymer Clay Cupcake Tutorial
How to make cute cupcakes out of polymer clay,
ready to hang on your bracelet, necklace, keychain
or wherever you need a cupcake to go.

.
.
.

1. and 2. : This is what you will need to craft your cupcakes.
I use Fimo clay but any polymer clay will do.
The colours I used here are brown (Fimo colour:No.7, Caramel) mixed with a tiny bit of black (No.9, Black), white (No.0, White) mixed with some effect colour (No.52, Glitter White) and red (No.26, Cherry Red).
You'll need a cutter of some sort, an eye pin, a wire cutter in case you need to shorten your eye pin, some clear (Fimo) varnish and baby wipes.
I strongly recommend that you use varnish that is especially made for polymer clays as the clay can react with certain types of varnish. You will constantly need the baby wipes because it's really important to clean your hands every time you change the clay colour you work with, especially if you go from a dark to a lighter colour.
Otherwise you'll have the darker clay mixed in with the light clay,
no good at all!
Enough of it already, let's start crafting!
3.: Condition your clay. Work it with your hands until it's soft and workable.
4.: Roll your clay out into the form of a sausage, then cut off equal amounts of clay. These will be the base for your cupcake.

5.and 6.: Shape one of the cupcake bases first into a ball, then flatten the ball and roll it on one side with your finger so you get a cupcake base form (see picture 6.)
Clean your hands with your baby wipes thoroughly.
7.: Make a thin sausage with your white clay and a slightly thinner sausage with your red clay.
8., 9. and 10.: Wrap the red sausage around the white one (8.), twist the two colours slightly so you get a tighter design (9.), then roll the newly formed striped sausage gently with your hand so you get a smooth and even blend of the red with the white (10.).

11.: Make a small ball out of white clay and place it on your cupcake base.
This is your cupcake filling.
12.: Now wrap the striped snake around your cupcake filling in a way that
real cream would do (see picture 13.)
14.: At this point I noticed that my cupcake bases were way too long, they resembled flowerpots more then pastry, so I just cut the base a bit shorter.
Almost all mistakes can be fixed somehow :)

15.: With your eye pin (or cutter) make some vertical markings along the cupcake base. You have to hold the cupcake real gently, by now the clay will probably be pretty warm and soft and you run the risk that you'll squeeze the whole thing too much by accident.
If you want to make sure you get a good result you can place the clay in the fridge for a while, the clay will be a bit more forgiving then and not give way so easily.
16.: Cut the eye pin to a length that will allow it to go a good way into the cupcake, not all the way through though.
17.: Gently push the eye pin into the middle of your cupcake.
18.: Optional: If you want to place any decoration on your cupcake that is made from clay too (and that can go into the oven), now is the time.
You can make sprinkles (out of thin coloured clay sausages that you cut into sprinkle length), hearts, pearls, whatever you can think up, really!

19.: Time to bake your cupcake! A word of advice here: it's officially recommended to clean the oven thoroughly after baking polymer clay in it or even better, get a little toaster oven only used for your polymer clay. It is plastic that you are melting here after all , so best to open a window too while you bake your clay.
I bake my clay on a sheet of baking paper in our gas oven, on gas mark 1.
Make sure your temperature is not too high, especially if you bake white or
transparent clay, otherwise it will turn a bit pink.
20.: When the cupcake has cooled off you can glaze it over
with your varnish. If you like the matte look of it just keep it like it is.
21.: Optional: If you would like to add some glitter to the cupcake,
do it now while the varnish is still wet!
I personally adore glitter so glitter it is! :)
22. and 23.: Get some jewelry glue and drop a little drop of glue on the spot where the eye pin goes into the cupcake. Jewelry glue will dry clear and not react with the Fimo but it is nescessary to fix the eye pin in some way to the clay, otherwise your cupcake will fall off pretty quickly. If you're planning on working a bit more with polymer clay
I can recommend getting some translucent liquid Fimo, it willl come in handy
all the time and it can be used to fix the eye pin to the cupcake too.
You should be done now and have an awsome homemade
cupcake in front of you!
Let it dry and wear it with pride, you made it yourself!
Sep 15, 2010
Vintage Style Polymer Clay Pendant
A reminder of times long gone...

I made this from polymer clay (Fimo in this case) and Fimo Bronze powder.
Sep 13, 2010
Rib cage/Spine T-shirt Reconstruction Tutorial
I noticed that the link to the tutorial of my rib cage T-shirt (which I descided now is a spine T-shirt :p )
is no longer active so I made my own tutorial now.
Here goes, have fun!

is no longer active so I made my own tutorial now.
Here goes, have fun!

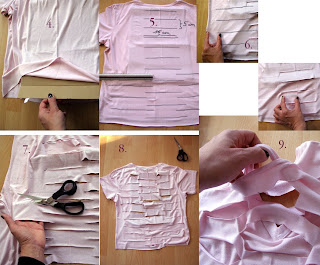
1.You'll need a T-shirt (I HIGHLY recommend a 100% or at least almost 100% cotton T-shirt with as little Lycra as possible in it),
scissors (do yourself a favour and get some tailoring scissors if you are into crafting, they will make your crafting life so much more easy, I personally did this FAR too late), a ruler and a pencil for light material/(tailor)chalk for dark material.
2. We'll only work and cut on the backside of the T-shirt. To find the middle just fold it down the middle and iron along the fold, that way you'll have your middle marked.
3.OPTIONAL: I always like my T-shirts without the seams (the collar and the bottom seamline), so if you like just cut them off. Don't thrown away the leftover border, there are a million things you can do with it! (like wrap it around your arm, instant win! :)

4. For easier drawing on and to make sure you don't cut through the front of the T-shirt push a piece of cardboard between the layers.
5. With the ruler, first draw the horizontal lines over the ironed middle line. Mine here were 16 cm/6.3 inch in width and had 5 cm/2 inch between them.
Then draw lines between the center lines, not all the way to the center and the outside of the T-shirt though (see picture 6).
7. Time to make the first cut! For easier cutting you can lift the T-shirt up a bit. Cut along your lines.
8. You should have someting like this now.
9. Now for the tricky bit. We'll weave the straps under-and-over now, starting at the top.
Ignore the very top strap, the neckline so to say. Skip the next strap too and grap the third strap.
Push the strap under the second strap that you just skipped, then bring it up and weave it over. You're still holding on to your innitial strap. Now grap the fourth strap through the strap in your hand, hold on to the new strap,weave the fifth strap through the one in your hand and so forth, you should have something like picture 10 now.
I know, it sounds ridiculous, but you'll totally get the idea once you see it all in front of you, try around a bit and you'll get there!

10. see above describtion.
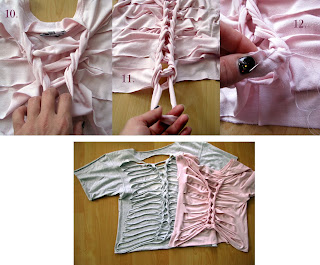
11. Braid all the way down the T-shirt.
12. When you have reached the end, either cut the last strap through and tie the ends to the side straps, or sew the last braided bit to the very last middle strap. I sew my ends together here.
You should be done now :)
The last picture shows the difference if you make more lines/straps, you get thinner 'rips'then.
Also, the grey T-shirt is 100% cotton, whereas the pink one is a viscose/polyester/lycra mix.
The normal 100% cotton T-shirts work SO much better for these kind of reconstructions, the straps curl themselfs up when you stretch them and look a lot better then if they have Lycra in them, then they will always spring back into place.
So try to work with a 100% cotton T-shirt.
Sep 7, 2010
The Key to the Asylum - inspired by Emilie Autumn
Fellow plague rats!
I present to you your very own
Key to the Asylum!

It can be attached to your favorite chain around your neck,
next to the teaspoon, right?
So you always know where your safe place in life is ;)
If you're interested in purchasing this item please send me an Email :)
I present to you your very own
Key to the Asylum!

It can be attached to your favorite chain around your neck,
next to the teaspoon, right?
So you always know where your safe place in life is ;)
If you're interested in purchasing this item please send me an Email :)
Quest in a bottle! Warcraft-style
Feeling lost and without orientation at times?
Fear no more, for I give you the
Quest in a bottle!

If in dire need smash the glass and accept the given quest,
it will point you in the direction you'll have to go.
Levelrange 1-80.
No loot guaranteed.
If you're interested in purchasing this item please send me an Email :)
Subscribe to:
Posts (Atom)