is no longer active so I made my own tutorial now.
Here goes, have fun!
1.You'll need a T-shirt (I HIGHLY recommend a 100% or at least almost 100% cotton T-shirt with as little Lycra as possible in it),
scissors (do yourself a favour and get some tailoring scissors if you are into crafting, they will make your crafting life so much more easy, I personally did this FAR too late), a ruler and a pencil for light material/(tailor)chalk for dark material.
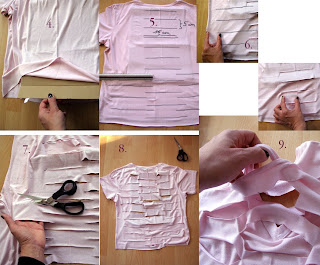
2. We'll only work and cut on the backside of the T-shirt. To find the middle just fold it down the middle and iron along the fold, that way you'll have your middle marked.
3.OPTIONAL: I always like my T-shirts without the seams (the collar and the bottom seamline), so if you like just cut them off. Don't thrown away the leftover border, there are a million things you can do with it! (like wrap it around your arm, instant win! :)
4. For easier drawing on and to make sure you don't cut through the front of the T-shirt push a piece of cardboard between the layers.
5. With the ruler, first draw the horizontal lines over the ironed middle line. Mine here were 16 cm/6.3 inch in width and had 5 cm/2 inch between them.
Then draw lines between the center lines, not all the way to the center and the outside of the T-shirt though (see picture 6).
7. Time to make the first cut! For easier cutting you can lift the T-shirt up a bit. Cut along your lines.
8. You should have someting like this now.
9. Now for the tricky bit. We'll weave the straps under-and-over now, starting at the top.
Ignore the very top strap, the neckline so to say. Skip the next strap too and grap the third strap.
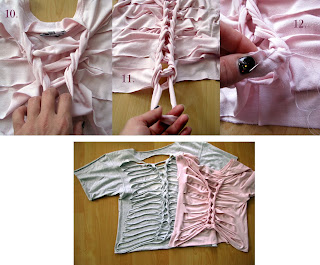
Push the strap under the second strap that you just skipped, then bring it up and weave it over. You're still holding on to your innitial strap. Now grap the fourth strap through the strap in your hand, hold on to the new strap,weave the fifth strap through the one in your hand and so forth, you should have something like picture 10 now.
I know, it sounds ridiculous, but you'll totally get the idea once you see it all in front of you, try around a bit and you'll get there!
10. see above describtion.
11. Braid all the way down the T-shirt.
12. When you have reached the end, either cut the last strap through and tie the ends to the side straps, or sew the last braided bit to the very last middle strap. I sew my ends together here.
You should be done now :)
The last picture shows the difference if you make more lines/straps, you get thinner 'rips'then.
Also, the grey T-shirt is 100% cotton, whereas the pink one is a viscose/polyester/lycra mix.
The normal 100% cotton T-shirts work SO much better for these kind of reconstructions, the straps curl themselfs up when you stretch them and look a lot better then if they have Lycra in them, then they will always spring back into place.
So try to work with a 100% cotton T-shirt.


This is AWESOME! I will be posting about it on DollarStoreCrafts.com :)
ReplyDeleteThat is awesome. I think I'll make one this weekend.
ReplyDelete<3 <3 <3
ReplyDeleteBlogged about this on my crafts tumblr! Thanks for such a cool project idea. :)
ReplyDeletehttp://procraftinate.tumblr.com/post/4641209296/via-http-dollarstorecrafts-com
This is amazing!
ReplyDeleteLove this :) We made one for my daughter :)
ReplyDeleteGlad you all like it :) There is something extremly pleasing in making something cool and new out of something old and boring :)
ReplyDeleteThis is really cool.
ReplyDeleteBecause I'm cutting a lot of jersey knit of late, and because I've discovered that I'm really bad at it, I went to JoAnn's this morning to look for tailoring scissors. It's a good thing that I talked to an older woman at the cutting counter, though she even looked at me oddly. She said that tailoring scissors is an old term and that they are no longer made. I was surprised by that.
I found some good scissors, but not what I went in for. lol
Now I'm just hoping I can follow this tutorial.
Hey, can someone do a video of this please?
ReplyDeleteHi Rafia, I personally don't have a Youtube channel where I post videos but I will try to make a video as soon as I get around to do so. Glad you stopped by my blog, thanks! :)
DeleteDoes this alter the size of the tshirt in any way? i have a lot of mens tshirts from my frumpy days that i'd love to be able to girl up with little DIY projects, but i purchased them to be mid-size tight and i dont want to make them remarkably tighter than they already are. they're all 100% cotton
ReplyDeleteHi Snuffles, I'm afraid they do get a bit tighter :( Maybe you can try streching them out again after you're done, with 100% it might work. Good luck, let me know how it worked out! :)
DeleteWonderful Tutorial!
ReplyDeleteI'm glad you enjoy it Yvette! Hopefully it turns out the way you want to :)
ReplyDeleteWhere is tutorial?
ReplyDeleteIf you scroll up you should see the tutorial, its in written form and has some pictures with it to explain the different steps of the tutorial.
DeleteThis comment has been removed by the author.
ReplyDeleteI'm gonna use this for Cosplay! I'm using it for Sans from "Undertale"!~
ReplyDeleteCool, good luck with it! <3
DeleteInteresting.
ReplyDeleteFantastic!
ReplyDelete